Information Found Below:
- Preparing For Next Day
- Pre-Op Checklist
- Laparoscopic Procedures
- Trauma Patient
- Presenting on Trauma & General Surgery Rounds
- Presenting on SICU Rounds
- Presenting in Oncology (Breast) Clinic
- Dressing Changes (Wet to Dry)
- IV Line
- Central Line
- Foley Catheter
- Endotracheal Tube
- Tying Knots & Suturing
- Online Textbooks
Preparing For Next Day
Trauma:
General:
- The patient list is updated every AM , thus you should not rely on the computer list. You should come in early and pick up the list to check for any discharges/ new pts
- The pt list can be picked up from the resident lounge every morning usually around 5 am or 1 hour prior to rounds. Students are responsible for covering all pts on the list that morning and must distribute them amongst themselves
- If you are on call and a pager is not available, in the morning, make sure you let the intern know the group of students who need to be contacted
General:
- OR schedule for the next day comes out at 5pm every day and can be looked at by asking the charge nurse at the OR front desk
- OR schedule can be viewed on Epic but not sure how accurate
- Look up pts basic info for next day OR cases (Dr Beech will not let you scrub in if you don't know them)
- Be prepared to present a brief history of the patient and make sure you know why the patient is getting surgery
- Look up doctors schedule and know where you are supposed to be (OR/clinic)
- If you have clinic try to get there early (right after rounds) and start looking up pts on the schedule
Pre-Op Checklist
(Note: Your priority should be assisting the resident, nurses and techs at all times.)
Entering the OR:
Pre-Op duties:
Getting Ready for the Case:
If you are scrubbing:
Once you the pt is in the room
When the pt is set up
Entering the OR:
- Before putting on your facemask and shoe covers, take a look at all the procedures you will be participating in and review pt history that you looked up the day before.
Pre-Op duties:
- Once you are masked and your shoes are covered go to pre-op and introduce yourself to the patient. If you see your attending or resident talking to the pt, you should be there as well. You may learn something!
(Note: Over each bed in pre-op is a number indicating the Operating room number for each pt.)
Getting Ready for the Case:
- Once you have seen your pt, go to the OR and pull up any pertinent imaging onto the big screen TVs.
(Note: The resident and attending like the simple things in life plus it makes you look on top of your game.)
If you are scrubbing:
- While you are in the OR, pull your gloves and gown. The scrub tech may have a spare gown on the table for you, so ask first. If not, go get one!
(Note: The techs are nice if you ask them where you can get things so that they don't have to do it. Otherwise they can be fairly evil to med students.)
Once you the pt is in the room
- Get the pt onto the bed
--Usually outpatients can move themselves onto the OR bed.
--If not, find a folded white sheet laying around and the black roller board. Fold the sheet over the board and have it ready to slide beneath the pt. Be ready to assist with rolling and pushing the pt. (Note: The nurse usually takes over at this point) - Position the pt
--First find the black belt and secure the pt to the bed
--Then, ask the resident of he/she wants the pt arms tucked at their side of spread out.
--Remember to put pink pads under each elbow and heel
--Lastly hook up the scds on the pts legs
- To tuck: Place the pt arms along his/her body. Lift the sheets so they are under the pt body but covering the pt arms. Then tuck the sheets under the pt.
- To spread arms: hook up the arm boards to the bed. Ask for the blue arm board covers from the nurse and put them over the arm board then place the pt arms onto the arm board.
When the pt is set up
- It is time to scrub in using the scrub packs with the red/pink outline!
(Note: If you have scrubbed once already and you have not left the OR, use the avaguard, unless told otherwise.)
Laparoscopic Procedures

This short guide is meant to give the medical student a crash course into the equipment in a laparoscopic case and ways they may be able to help before and during the case. As always, make sure to ask the nurse before any alterations to the room or equipment.
CHOLECYSTECOMY/APPENDECTOMY
- Patient position and room setup
--To the right is an example of a common room setup used for many different procedures. - Before the patient is in the room, ensure that there is a video cart and sufficient monitors for the case, and that they are oriented correctly.
CHOLECYSTECOMY/APPENDECTOMY
- Ensure the video tower has all the necessary component for your case. Each standard tower should be equipped with the following
--Monitor
--Insufflator
--Video Processor
--Light source
--Printer
--Gas Tank - Insufflator
--Used to pump CO2 to into the abdomen during the procedure.
--Ensure that there is a full tanks of gas available for the case
----Measured by the gauge to the right labeled “Gas Supply”
----If empty, make sure to ask the nurse before the case begins to switch out CO2 tank
----If no one is available during the case, “Start” and “Stop” buttons can be used to begin insufflation
----Insufflation tubing is placed on the metal prong at the lower center of the device - Video Processor
--Connection to the camera will be given off the operative field during the case and plugged in to the video processor
--White balancing can be performed by pushing Wh/B - Light Source
--A fiber optic cable will be given off the operative field and plugged into the light source
--Lamp button can be pressed to turn the light on and off
STANDARD VIDEO TOWER

INSUFFLATOR

VIDEO PROCESSOR
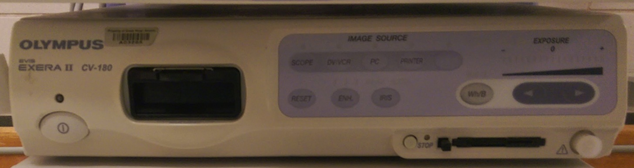
LIGHT SOURCE

Trauma Patient
- Make sure the portable ultrasound is in the room where the patient is arriving and make sure it is clean
- Remove (cut if necessary) patient’s clothes and put in plastic patient bag (in bottom shelf of trauma carts)
(Note: helpful if at least one person on the team has/buys trauma shears) - Get warm blankets for the patient and cover them up
- Assist with rolling the patient and remove backboard if he or she is laying on one
- Find out of the trauma captain wants you to inform them when X-ray is done in the room and do so
- If the patient is getting a CT:
--Obtain a portable monitor (usually sitting plugged in on the counter in the trauma bay) and be ready to hook the patient up (3 lead EKG, BP cuff, pulse oximeter) when X-ray is finished
--Help transport the patient to the CT with an intern/resident
--May be asked to call CT to see if they are ready for patient (x52649)
--Make sure to bring at least one patient sticker for the CT tech
--After returning from CT, hook patient back up to main monitor - If the patient is emergently going to the OR:
--Help transport patient to OR
--Help with preparing the patient for surgery (see Pre-Op Checklist section)
- Familiarize yourself with the materials in the trauma carts as you may be asked to retrieve items
- Unless helping remove clothing, providing blankets, and assisting rolling the patient, it is best to stand outside of the blue square (on the floor)
- Be ready to clean and bandage wounds as directed by resident (varies based on wound)
- Obtain 500 ml NS bottle and chlorhexidine prep
- With needle, put holes in top of NS bottle
- Place chucks under area of wound and obtain basin
- Sterilize wound with chlorhexidine prep
- Flush wound with entire bottle with firm pressure into basin
- Cover with sterile 4x4’s and secure with tape
PORTABLE MONITOR

Presenting on Trauma & General Surgery Rounds
- Always start with a one-liner, which is a brief summary statement about the patient.
--Ex. Mr. AB is a 25 yo male POD3 s/p subtotal gastrectomy for gastric cancer who has developed leukocytosis and bilateral DVTs. - 24 hour events
--Mention acute events overnight, procedures done such as foley catheter removal, CT was done (don't give results here), patients refusing treatment etc. - Subjective: Pertinent review of systems.
--Ex. Pt. does not have nausea or vomiting, no fever or chills, shortness of breath or chest pains. Has not passed flatus, has not had a bowel movement, is voiding well, ambulating and using incentive spirometer. - Vitals: Check with your resident but typically 24H ranges are preferred, except temperature which you give a Tmax over 24H.
--Tmax, BP, pulse, respiratory rate and SpO2 on room air or nasal cannula. Give it in this order. - Inputs/outputs (I/O’s): mention “net I’s and O’s” first, then break down.
--Net I/O: +500 I: 500 PO, 1000 IVF O: 900 urine catheter, 100 JP drain
--Don’t have to mention units. - Physical exam: Things to always include general, pulmonary, cardiac, GI and extremities, with special attention to the pertinent. Depending on your resident, they might have variations but initially you should mention these, unless otherwise stated.
--Gen: reclined in no acute distress, alert and oriented to time, place, situation. NAD, AAOx3
--Pulm: Chest clear to auscultation bilaterally, no rales, wheezes or ronchi (CTAB, no r/w/r)
--CV: Normal rate and rhythm/ tachycardic but normal sinus rhythm, no murmur, rubs, gallops (NRR/NSRR, no m/r/g)
--GI: distended, hypoactive bowel sounds, appropriately tender to palpation, incision site had no erythema, no purulent discharge and no fluctuance OR just say no signs of infection. JP drain at right side, draining 50 cc serosanguinous drainage. Dressing is clean, dry and intact (c/d/i)
--Extremities: pulses present, warm to touch, no pedal edema. - Labs, imaging, physical therapy, occupational therapy, consults
--For labs, for a CBC just say “CBC 12.2, 10.3, 235” and it is understood as WBC is 12.2, hemoglobin is 10.3 and platelet is 235. They do not need and do not want to know hemoglobin AND hematocrit. Just one or the other.
--For Chemistry pannel read numbers out as well in the direction the arrows are pointing.
--Also for any abnormal values, mention its trend whether it is trending upward or downward and the previous value. Ex: 12.2 trending downward from 16.0 (for WBC) - Assessment and Plan
--Mr. AB is a 25 yo male POD1 s/p subtotal gastrectomy for gastric cancer who has developed leukocytosis and bilateral DVTs.
--Postoperatively, patient is progressing well.
--Gastric cancer, follow up on pathology.
--Leukocytosis is trending downwards, patient is afebrile so the plan will be to monitor temperature and trend CBC’s
--B/L DVTs, patient is on heparin drip. Continue to monitor PTT and anti-Xa assay. Monitor for bleeding.
***KNOW your patient, KNOW your resident and KNOW you attending***
Example notes below:
|
| ||||
Presenting on SICU Rounds
Brief Summary - One line overview to identify patient and why they are in the ICU. Hospital or ICU Day #__ POD #__.
Significant or acute events - over the past 24 hours and/or acute changes
Neurological: State of Consciousness: Exam (including GCS). Sedation: Propofol/Benzodiazepine rate and Pain. Include intracranial pressure and any CT scans if applicable
CV: Cardiac Exam. HR, Rhythm, BP [Range SBP and DBP]. Recent MAP + range. Hemoglobin and Hematocrit (Current, Previous Values) Central Pressures and Cardiac Parameters, if being records Peripheral pulse exam
Pulmonary: Lung exam. Spontaneous RR Vent settings: Mode, Rate, Tidal Volume, PS, PEEP, FiO2 versus off vent on RA/ Supplemental Oxygen. ABG – pH, pCO2, paO2, HCO3- , Base deficit or excess
Renal: I/O’s last 24 hours. IVF and rate. Urine output: total and hourly rate. BUN/Creatinine (today/previous levels). Total fluid balance since admission. Current weight (Weight change or baseline weight on admission). Talk about diuretics here
Fluids: Maintenance fluid rate. Drips. TPN or enteral nutrition volume. Free water replacement. Fluid volume with medication.
Electrolytes: Sodium, Potassium, Chloride, Bicarbonate, Glucose, Calcium, Magnesium and Phosphorus – most recent levels and prior levels, if abnormal. LFT’s
Gastrointestinal: Abdominal exam. Flatus/BM. NGT. Drain output Abdominal Wound findings. Drains & output
Nutrition: Dietary status/tolerance. TPN and/or enteral tube feeding mechanism, rate, total calories/day. Protein - grams/Kg, Carbohydrates - grams/Kg, and Fats - grams per kilogram. Triglycerides. Nitrogen balance. Date, Albumin, Prealbumin date (Attendings will love you if you say all of this)
Hematological: PT/INR/PTT and Platelet count. Hemoglobin and hematocrit (may be presented here or during CV). Fibrinogen and d-dimers, if drawn.
Infectious Disease: Temperature (Temp max and time, Temp currently). WBC currently (previously) & differential (if pt has a leukocytosis or it’s abnormal (> 10% bandemia, eosinophilia, +/- lymphocytosis).
Most recent culture data, including microbe, date obtained, antibiotic sensitivity,
Antibiotic therapy – Day #/Of # of days abx prescribed
Other stuff to add: Prophylaxis: DVT: TED/SCDS, GI ulcer prophylaxis, SQ Heparin, Lovenox, GI ulcer prophylaxis, etc. IVC filter: Yes or No. Date placed: __/__/__
Then after this you go back through each system starting from neuro and do an Assessment/Plan for each one in the same order. Good luck!
Presenting in Oncology (Breast) Clinic
CC:
HPI:
For painful lesions, us mnemonic: “OLD CARTS”—onset, location, duration, character of pain, alleviating/aggravating factors, radiating pain (if yes, where?), timing (AM/PM, frequency), setting i.e. precipitating factors
Lumps? (location, mobile or fixed)
Discharge? If yes, describe (color, smell, precipitating factors)
Skin changes?
PMH:
Any personal history of cancer? (when, diagnosis/type, treatment, current state)
GynHx
- age of menarche
- age of menopause
- GxPxTxPxAxLx (Gravida, Parity, Term, Pre-Term, Abortus, Living)
Age when first baby was born. Breastfed and for how long? (repeat for each child)
SxHx *include if patient has had a colonoscopy
Medications and Allergies
FHx:
Any family member with history of any type of cancer?
- relationship to patient
- diagnosis
- age at diagnosis if known
SHx:
Alcohol use
Tobacco use *not a risk factor for breast cancer
Other drug use
ROS: Fever, fatigue, night sweats, weight loss, etc.
Physical Exam:
Vitals
General
HEENT check for lymphadenopathy!
Pulmonary
Cardiac
Breast
- Ask patient to place her hands on her hips to observe. Note whether breasts are pendulous, symmetric.
- Have patient recline. Pull foot rest out, raise arm over her head, and keep side you are not examining covered.
- Look first: skin changes (even moles), lumps/masses, dimpling, nipple discharge
- Check for axillary lymphadenopathy
- Use pads of fingertips to perform breast exam (describe tissue e.g. soft, cystic, dense; fixed vs. mobile masses);
include the nipple and check for discharge
- Note whether patient is tender during exam
*Use clock to describe location of lesion and measure distance from nipple e.g. 1x1cm lesion at 2:00 on right 4 cm from nipple
Abdomen
Extremities check feet!
Imaging: Review any ultrasound or pathology results. Report BIRADS, clinical and pathological staging if available. Be sure to mention whether findings are benign or not.
Assessment & Plan:
Age
Gender
Pertinent PMH
Findings/diagnosis
e.g. Jane Doe is a 45-year-old female with a PMH of cervical cancer s/p radiation and chemotherapy presenting with a fixed left-sided breast mass
- u/s scheduled for…
- f/u in x weeks to review results
Dressing Changes (Wet to Dry)
Wet to dry dressings are generally used to remove dead tissue and drainage from a wound. If the wound is deep or has tunneling spaces, gauze will also need to be put in those spaces. This is called packing and it allows the wound to heal from the inside out. Without the packing, the space may close off to form a pocket and not heal properly. The patients that will most likely require wet to dry dressings on this rotation will be those that have undergone a celiotomy with secondary intention closure.
Patients will usually have orders written in their chart that specify how often their dressings need to be changed. The frequency of dressing changes varies with the type of wound, infection status, and other comorbidities. Dressings will also need to be changed if they come loose, get dirty, or you can see wound drainage on the outside of the dressing.
Steps for changing the dressing:
- Foam up!
- Non-sterile gloves
- Kerlix gauze bandage roll
- 4x4 gauze squares
- Abdominal pad
- Tape
- Scissors
- Normal saline
- Put on gloves
- Carefully remove the tape, dressing pads, and gauze packing of the old dressing.
- Place the old dressing and packing in the trash
- Pay attention to the color and amount of any drainage from the wound. Look for drainage that has become darker or thicker
- Remove your gloves and throw them in the trash.
- Re-foam and re-glove
- If necessary, moisten a gauze pad with normal saline and wipe wound gently or use a squirt bottle or syringe with normal saline solution to clean the wound.
- Check the wound for signs of infection and notify your resident if you find any of the following:
- Skin around the wound is more red, swollen, or feels hot
- Wound gives off a foul smell
- Purulent drainage
- Patient exhibits a temperature above 101° F
- Open the Kerlix package an unroll enough to loosely pack the wound
- Use scissors to cut the Kerlix to the correct length
- Place the desired amount of Kerlix back into the plastic package and pour saline into the package and onto the gauze
- Squeeze out the excess liquid from the gauze so it is not dripping wet
- Loosely place the gauze in the wound. You may need to use a cotton swab or forceps to pack small spaces
- Be sure the wet gauze is not on the healed skin around your wound because it may macerate the skin
- Put a layer of dry 4x4 gauze squares on top of the Kerlix
- Cover the 4x4’s with an abdominal pad
- Tape the edges of the pad to hold it in place
- Write the date and time on the outside of the dressing to help you remember when it will need to be changed next
- Dispose of the empty packages and put your supplies away
- Remove your gloves and wash your hands again
IV Line
- Assemble your equipment.
- Don a pair of appropriately sized non-latex examination gloves.
- Apply tourniquet to the IV arm above the site.
- Visualize and palpate the vein.
- Cleanse the site with a chlorhexidine or alcohol swab using an expanding circular motion.
- Prepare and inspect the catheter:
Remove the catheter from the package.
Push down on the flashback chamber to ensure it is tight.
Remove the protective cover.
Inspect the catheter and needle for any damage or contaminants.
Spin the hub of the catheter to ensure that it moves freely on the needle
Do not move the catheter tip over the bevel of the needle. - Stabilize the vein and apply traction to the skin.
- Insert the needle through the skin at 20-30 degree angle and then reduce the angle as you advance through the vein.
- Observe for "flash back" as blood slowly fills the flash back chamber.
- Advance the needle approximately 1 cm further into the vein.
- Holding the end of the catheter with your thumb and index finger, pull the needle (only) back 1 cm with your middle finger.
- Slowly advance the catheter into the vein while keeping tension on the vein and skin.
- Remove the tourniquet.
- Secure the catheter by placing the Tegaderm™ over the lower half of the catheter hub taking care not to cover the IV tubing connection
- Occlude the distal end of the catheter with the 3rd, 4th and 5th fingers of your non-dominant hand.
- Secure the catheter hub with your thumb and index finger and carefully remove the needle.
- Place the needle into the sharps container.
- Check the patency of the IV line by flushing the line with a syringe filled with normal saline. If any swelling of fluid is noted around the IV site, infiltration of the vein has occurred. Remove the IV catheter and attempt at another site.
- Remove the cover from the end of the IV tubing and insert the IV tubing into the hub of the catheter or cap the end of the catheter with a lock.
- Place a piece of tape over the catheter hub.
- Make a small (kink free) loop in the IV tubing and place a second piece of tape over the first (piece of tape) to secure the loop.
Central Line
- Explain to the patient what you are about to do.
- Choose the site for insertion: the jugular and femoral veins carry less bleeding risk and low risk of pneumothorax; the subclavian vein is a cleaner site and is technically more difficult – we have not covered the technique here. The femoral vein is probably the easiest site. Put on your gloves and gown. Clean and drape the site.
- Tilt the head end of the bed down by 10°–15°.
- Draw up 10 ml of lidocaine; raise a bleb on the skin with a 27-gauge needle.
- Infiltrate local anesthetic all around the site, working down toward the vein. Pull back on the plunger before injecting each time to ensure that you don’t inject into the vein.
- Have the assistant open the central line pack and take all of the items out. Ensure that the wire moves freely on its reel – you will need to advance the wire one-handed.
- Flush each port of the central line with saline or heparin saline, and close off each line except the distal (usually brown) line; the wire threads through this line.
- Attach a syringe to the large needle provided, and then proceed as follows:
– right femoral line: find the arterial pulse and enter the skin 1 cm medial to this, at a 45° angle to the vertical and heading parallel to the artery. Advance slowly, aspirating all the time, until you enter the vein
– right jugular line: palpate the carotid artery with your left hand, covering the artery with your fingers. Insert the needle 0.5–1 cm laterally to the artery, aiming at a 45°angle to the vertical. In men, aim for the right nipple; in women, aim for the iliac crest. Advance slowly, aspirating all the time, until you enter the vein. If you fail to aspirate blood after entering 3–4 cm, withdraw, re-enter at the same point, but aim slightly more medially - When the needle is in the vein, ensure that you can reliably aspirate blood. Remove the syringe, keeping the needle very still, and immediately put your thumb over the end of the needle.
- Insert the wire into the end of the needle, and advance the wire until at least 30 cm are inserted. The wire should advance very easily – do not force it.
- Keeping one hand on the wire at all times, remove the needle, keeping the wire in place. Make a nick in the skin where the wire enters the skin. Insert the dilator over the wire and push into the skin as far as it will go. Remove the dilator.
- Insert the central line over the wire. Keep one hand on the wire at all times. When the central line is 2 cm away from the skin, slowly withdraw the wire back through the central line until the wire tip appears from the line port. Hold the wire here while you insert the line. Leave a few centimeters of the line outside the skin. Withdraw the wire and immediately clip off the remaining port.
- Attach the line to the skin with sutures. Tie loosely so as not to pinch the skin; this causes necrosis and detachment of the line. Clean the skin around the line once more, dry, and cover with occlusive dressings.
- Ensure that you can aspirate blood from each lumen of the line, then flush each lumen with saline or heparin saline.
- Order a chest x-ray to check for line position and pneumothorax if a jugular or subclavian line has been inserted. Femoral lines do not require an x-ray.
Foley Catheter
- Assist patient into supine position with legs spread and feet together (frog position)
- Open catheterization kit and catheter. Take care as the inside of the kit is sterile.
- Put on sterile gloves.
- Check balloon for patency by inflating and deflating it.
- Generously coat the distal portion (2-5 cm) of the catheter with lubricant
- Apply sterile drape.
- If female, separate labia using non-dominant hand and identify the urethral opening. If male, hold the penis with the non-dominant hand. Maintain hand position until preparing to inflate balloon.
- Using dominant hand to handle forceps, clean peri-urethral mucosa with cleansing solution. Swipe the cleansing swab in anterior to posterior motion. First swab medially, then use two swabs lateral to the first swipe. One swipe per swab. Discard swabs away from sterile field after use.
- Pick up catheter with dominant hand.
- In the male, firmly lift the penis anteriorly, perpendicular to the pt’s body.
- Identify the urinary meatus and gently insert until 2 inches beyond where urine is noted
- Inflate balloon, using correct amount of sterile liquid
- Gently pull catheter until inflation balloon is snug against bladder neck
- Connect catheter to drainage system. Secure catheter to abdomen or thigh, without tension on tubing. Place drainage bag below level of bladder
Endotracheal Tube
- Before you begin, pre-oxygenate the patient with 100% oxygen.
- Administer sedative via IV push. Then administer paralytic via IV push.
- Position the head so that the head is slightly tilted back and chin points anteriorly
- Identify an endotracheal tube length to use. A useful formula: 12+age/2 = length at lips.
- Open the mouth and insert laryngoscope to visualize the vocal cords
- Insert the endotracheal tube
- Inflate the cuff to secure the position of the tube
- Attach ventilation bag. Auscultate the stomach first; then auscultate bilateral anterior chest walls. If breath sounds are absent in chest or if gurgling is present in the stomach, deflate the cuff and remove the tube. If breath sounds are absent in one lung field, it may be necessary to retract the tube.
Tying Knots & Suturing
Online Textbooks
 AccessSurgery Homepage. Scroll down to the bottom and click on Clerkship to access Pretest, Lange and Case Files.
AccessSurgery
Login:
Username: msmsurg
Password: grady1
OR We currently have access to all of Emory’s Woodruff Health Sciences Library. LOG IN with your emory ID (info)
Emory University Users - if you have forgotten your password:
Why is AccessSurgery useful?
RESOURCES
Includes CASE FILES 4E
PRE TEST
LANGE Q+A
Schwartz Textbook of Surgery
Exploring Surgery & Exploring Radiology (useful in every rotation)
Login:
Username: msmsurg
Password: grady1
OR We currently have access to all of Emory’s Woodruff Health Sciences Library. LOG IN with your emory ID (info)
Emory University Users - if you have forgotten your password:
- If you have registered answers to authentication questions, click Forgot Your Password?
- If you have not registered answers to authentication questions, please call the University Service Desk at 404-727-7777
Why is AccessSurgery useful?
RESOURCES
Includes CASE FILES 4E
PRE TEST
LANGE Q+A
Schwartz Textbook of Surgery
Exploring Surgery & Exploring Radiology (useful in every rotation)

